If a jeans button came off, inspect the waistband hole before fitting a replacement. A sound hole may accept a matched tack button; a torn or enlarged hole should be patched and stabilized first. For bulk production, the permanent fix is to match the button, tack length, waistband thickness, press die and wash process.
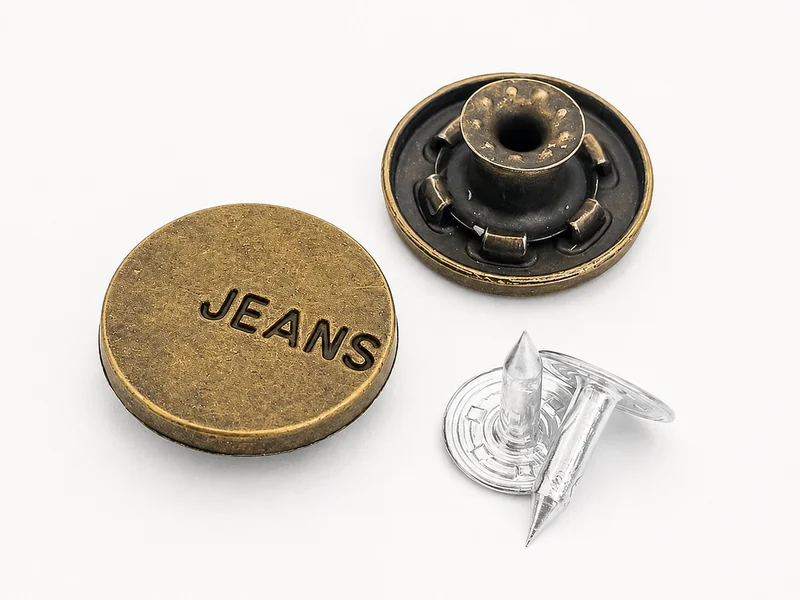
First identify what failed
The metal waistband closure on most jeans is a jeans tack button. The visible button body locks onto a separate tack or nail pushed through the waistband from the back. It is different from a four-part snap fastener and from the small rivets used at pocket corners.
| What failed | What it usually means | Next action |
|---|---|---|
| Button body separated but tack remains | Internal button-to-tack connection failed or parts were incompatible | Remove the remaining tack and replace the matched set |
| Complete button pulled through the waistband | Hole enlarged or surrounding denim lost strength | Repair the fabric before installing a replacement |
| Tack bent during setting | Off-center press, unstable support or tack mismatch | Correct alignment and use a matched die |
| Button rotates or feels loose | Incomplete setting, long tack or compressed fabric stack | Section a sample and compare tack length |
| Rust or staining after wash | Core material or finish did not suit processing | Review material specification and wash validation |
How to replace a jeans tack button
- Check the waistband hole. Look at both sides. If the weave is intact and the hole still grips the tack, proceed with a matched replacement. If the area is frayed, torn or enlarged, repair it first.
- Remove damaged hardware. A deformed tack or button should not be reused. Use the appropriate removal tool and protect the fabric; a tailor or repair shop is the safer option when the part is difficult to access.
- Patch a damaged attachment point. Darn or stitch a stable denim patch into the waistband construction so the new fastener is supported by sound material rather than the old opening alone.
- Select a compatible button and tack. Match the button's internal shank, tack profile and tack length to the repaired fabric stack.
- Set the button squarely. Push the tack through from the inside, support the button face with a matched die, and apply pressure in line with the shank. Follow the hardware and tool instructions.
- Inspect before wear. The cap should sit level without spinning, the tack should be fully engaged and the surrounding denim should not pucker or split.
A hammer-on kit may be acceptable for a one-off repair when its instructions match the hardware. Apparel factories should use a controlled press and matched dies so setting force and alignment are repeatable.
Developing denim hardware? Send the waistband stack, wash process, preferred button diameter, finish, logo artwork and order quantity.
View jeans tack buttonsWhy jeans buttons fail in production
Button and tack are not a matched pair
The shank cavity and tack profile are engineered together. A standard-looking replacement tack can damage the button or fail to lock. Approve the button and tack under one item specification.
Tack length does not match the waistband stack
A denim waistband can include multiple denim plies, fusible interlining, seam allowances and labels. Measure the attachment point after construction and after any process that changes thickness.
The attachment point has lost strength
Oversized punching, repeated re-setting and weak or damaged fabric reduce the material held between the button and tack. Avoid installing a replacement into an enlarged hole without repair.
The press is not square to the button
An off-center blow bends the tack or loads one side of the shank. Confirm the top and bottom die profiles, support surface, press alignment and operator method before approving the line.
The hardware was approved before washing only
Denim processing can change fabric thickness, surface abrasion and hardware appearance. Review the attachment after the production wash, not only on the unwashed sewing sample.
Repair choice by hole condition
| Hole condition | Practical route | Do not do this |
|---|---|---|
| Small and stable | Install a compatible replacement in the original position | Mix an unknown tack with the old button body |
| Frayed but localized | Stabilize and darn the area, then remeasure the stack | Set directly through loose fibers |
| Torn or enlarged | Add a structural patch or rebuild the waistband area | Depend on glue alone at a high-load point |
| Multiple buttons failing in one lot | Stop the line and audit hardware, dies and setting records | Treat every failure as an isolated repair |
Bulk denim approval checklist
For a recurring failure, keep a short approval record that connects the hardware to the garment construction. This lets the buyer, trim supplier and sewing factory review the same evidence instead of relying on an isolated button photo.
| Control point | Record on the approval sheet | Release question |
|---|---|---|
| Matched hardware | Button code, tack code, material, finish and lot reference | Are the approved button and tack from the same specified set? |
| Waistband build | Finished stack thickness, denim layers, interlining and label overlap | Was the tack selected against the actual attachment point? |
| Setting process | Press type, top and bottom die references and trial operator | Does the cap sit level with full engagement and no fabric cutting? |
| Finished garment | Wash recipe or process name, appearance result and buyer-required checks | Does the approved set remain acceptable after the production process? |
| Failure sample | Front, back and cross-section photos plus the failed garment lot | Can the team separate a component, fabric or setting cause? |
- Button diameter, cap design, shank construction and logo artwork are approved.
- Tack profile, material and length are tied to the same specification.
- The trial uses the production waistband construction and finished wash recipe.
- The garment factory has the correct dies for its hand, pneumatic or automatic press.
- Operators check level seating, rotation, tack engagement and fabric damage.
- Finished garments follow the buyer's required attachment, wash, corrosion and appearance checks.
- Reference samples and lot labels remain available for line comparison.
Frequently asked questions
What is the metal button on jeans called?
It is usually called a jeans tack button, jean button, denim button or hammer-on jeans button. It has a visible button body and a separate tack or nail pressed through the waistband.
Can you replace a jeans button without sewing?
If the waistband hole is still sound, a matched replacement tack button can often be installed without sewing. If the hole is torn or enlarged, repair and reinforce the fabric before installing new hardware.
Can a new jeans button go into the old hole?
Only when the old hole is small, stable and not frayed. A loose or enlarged hole should be patched or darned first because a new tack set into damaged fabric may pull out again.
Why did the jeans button fall off?
Typical causes include an incompatible tack, incorrect tack length, a damaged waistband hole, off-center pressing, insufficient reinforcement or a material and finish combination not validated through the garment wash process.
What should a denim buyer test before bulk production?
Approve the exact button and tack on the production waistband construction, then follow the buyer's required attachment, wash, corrosion and appearance checks on finished garments.
Need a matched jeans button and tack?
Send front and back photos, total waistband thickness, finish, wash process and quantity.
Request denim hardware samples